Create Custom VisTrails Modules from Mathematica Scripts
Download all materials:
bullet-reconstruct-vistrails.zip
Prepare Mathematica scripts
Here is an example Mathematic script test.m:
(* sudo ln -s /Applications/Mathematica.app/Contents/MacOS/MathKernel /usr/local/bin/math *)

(* cmd: math -script test.m art-large-before.jpg art-large-after.jpg 0.1 4 result.jpg *)


perr = WriteString["stderr", ##]&;
eval = ToExpression[##]&;

ARGV = Drop[$CommandLine, 3];
Print[ARGV]
Print[Length[ARGV]]


f1 = ARGV[[1]];
f2 = ARGV[[2]];
threshold = eval[ARGV[[3]]];
dila = eval[ARGV[[4]]];
f3 = ARGV[[5]];

Print[threshold]
Print[dila]

imageBefore = Import[f1];
imageAfter = Import[f2];
imageDifference = Dilation[Binarize[ImageSubtract[imageAfter, imageBefore], threshold], dila];
n = MorphologicalEulerNumber[imageDifference];
Print[n]
Export[f3, imageDifference, "JPEG"]

Exit[]
Create custom wrapper modules in VisTrails
For example, we have a mathematic script called inspectHDF5.m, give it a hdf5 data, it will read the data, do a default histogram plot and export to an image, do another histogram using a user-specified parameter set and export to another image. You run this script as
$ /usr/local/bin/math -script inspectHDF5.m datafilename histgram-parameters hist1 hist2
$ /usr/local/bin/math -script inspectHDF5.m "bullet_volume_{256,267,267}.h5" "{-1, 2, 0.05}" hist1.jpg hist2.jpg
To wrap this script into a VisTrails module, from menu, Packages -> CLTools -> Open Wizard, a commandline packaging tool will appear, see below screenshot for setup:
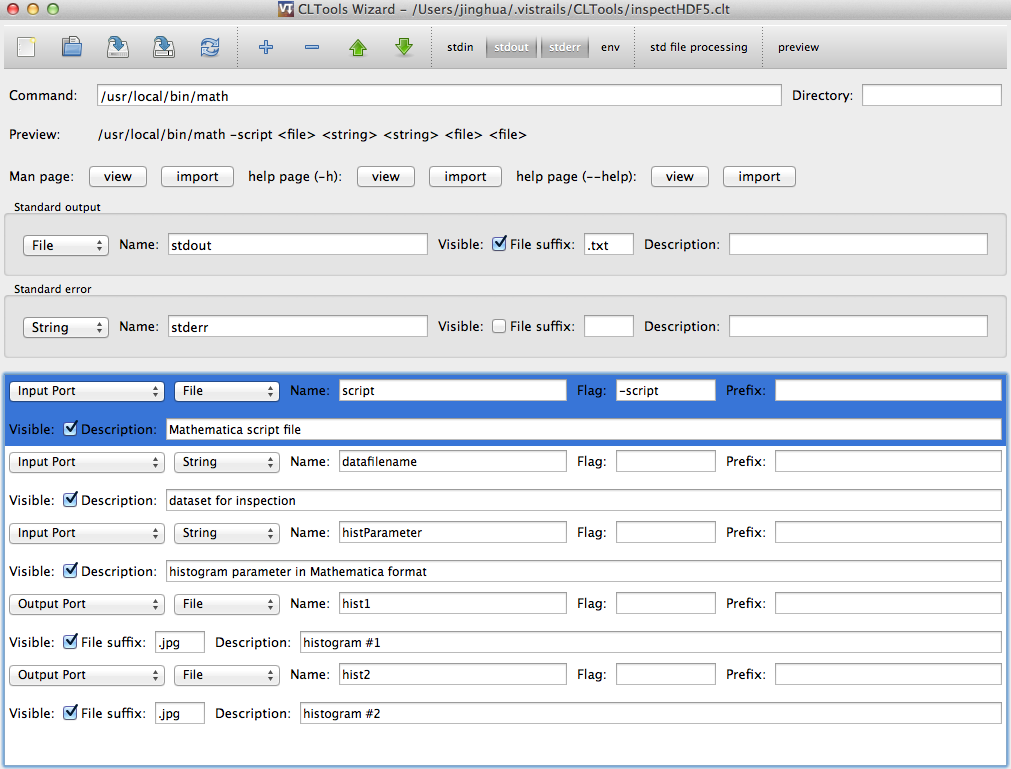
After setup, click the “save” button, it will be save as:
~/.vistrails/CLTools/inspectHDF5.clt
If the .clt file is not saved in ~/.vistrails/CLTools/ directory, copy the file into that directory, so VisTrails can load the wrapper.
This .clt file is a description of the wrapping in xml format, you can use any text editor to view and edit it directly if you know the syntax well. To enable the module, click the “Save and Reload” tool in CLTools wizard, or go to Vistrails->Preference->Module packages, find CLTools in “enabled packages”, click “Reload”, if everything goes well, you should find those modules under CLTools section in Vistrails GUI. The module can be draged to the pipeline panel to build your workflow!
Distribute the custom modules
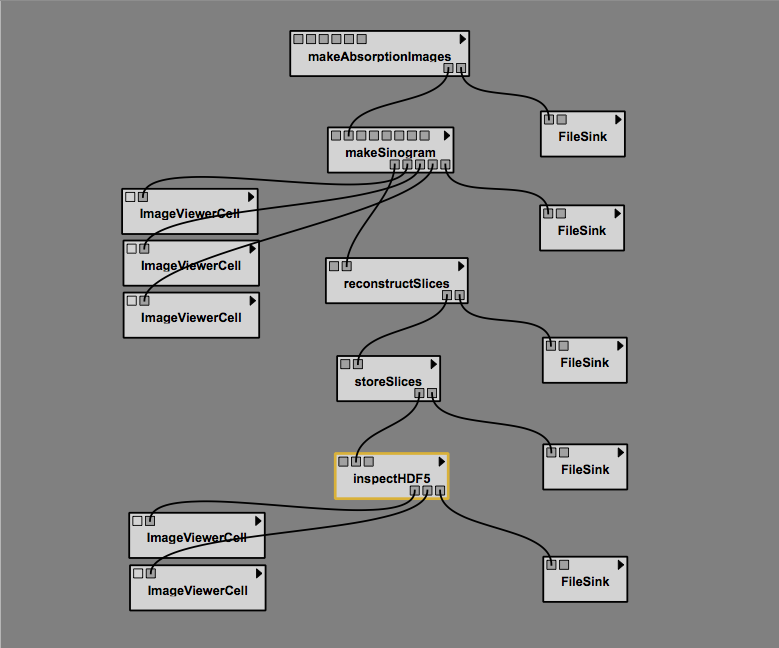
To show you how to distribute the custom modules, I have make an example distribution, it is a tomography data reconstruction workflow, using a bullet dataset. The custom modules are named “makeAbsorptionImages”, “makeSinogram”, “reconstructSlices”, “storeSlices”, and “inspectHDF5”, they are wrappers for Mathematica scripts “makeAbsorptionImages.m”, “makeSinogram.m”, “reconstructSlices.m”, “storeSlices.m”, and “inspectHDF5.m”
The sample workflow making use these modules:
To prepare for distribution, I made a directory hierarchy like this:
bullet-reconstruct-vistrails/
  CLTools/
         makeAbsoroptionImages.clt
         makeSinogram.clt
         reconstructSlices.clt
         storeSlices.clt
         inspectHDF5.clt
  Mathematica-scripts/
         makeAllAbsorptionImages.m
         makeSinogram.m
         reconstructSlices.m
         storeSlices.m
         inspectHDF5.m
  bullet-reconstruction.vt
copy all of the file in CLTools folder into: ~/.vistrails/CLTools/
go to Vistrails->Preference->Module packages, find CLTools in “enabled packages”, click “Reload”
you should find those modules under CLTools in Vistrails GUI.
To run the workflow
Make sure the MathKernel can be called from commandline as: math
$> which math
You can run the commandline first to make sure Mathematica executes the scripts correctly.
$> math -script makeAllAbsorptionImage.m "/Users/jinghuage/Documents/VisTrails/bullet-reconstruct-vistrails/raw_bullet_images/" "OpenBeam_600s" "DarkImage_FastShutterClosed_100s" 256 256
Be aware where is your project path in your file system, you need to have the raw bullet images saved in your project directory as: <path-to-project>/<raw-bullet-images-path>/Bullet* files, and the OpenBeam_600s and DarkImage_FastShutterClosed_100s files need to be saved inside the <path-to-project>/<raw-bullet-images-path>/ directory as well.
If not already exist, those directories will be created by the workflow in the same path: <path-to-project>/bullet_absorption_images/, <path-to-project>/figures/, <path-to-project>/sinograms/, <path-to-project>/slices/.
the reconstruced hdf5 file will be created by the vistrails workflow as : <path-to-project>/bullet_volume_{256,267,267}.h5
open bullet-reconstruction.vt in Vistrails, in history panel, find and select workflow version tagged as “full-new-parameter”.
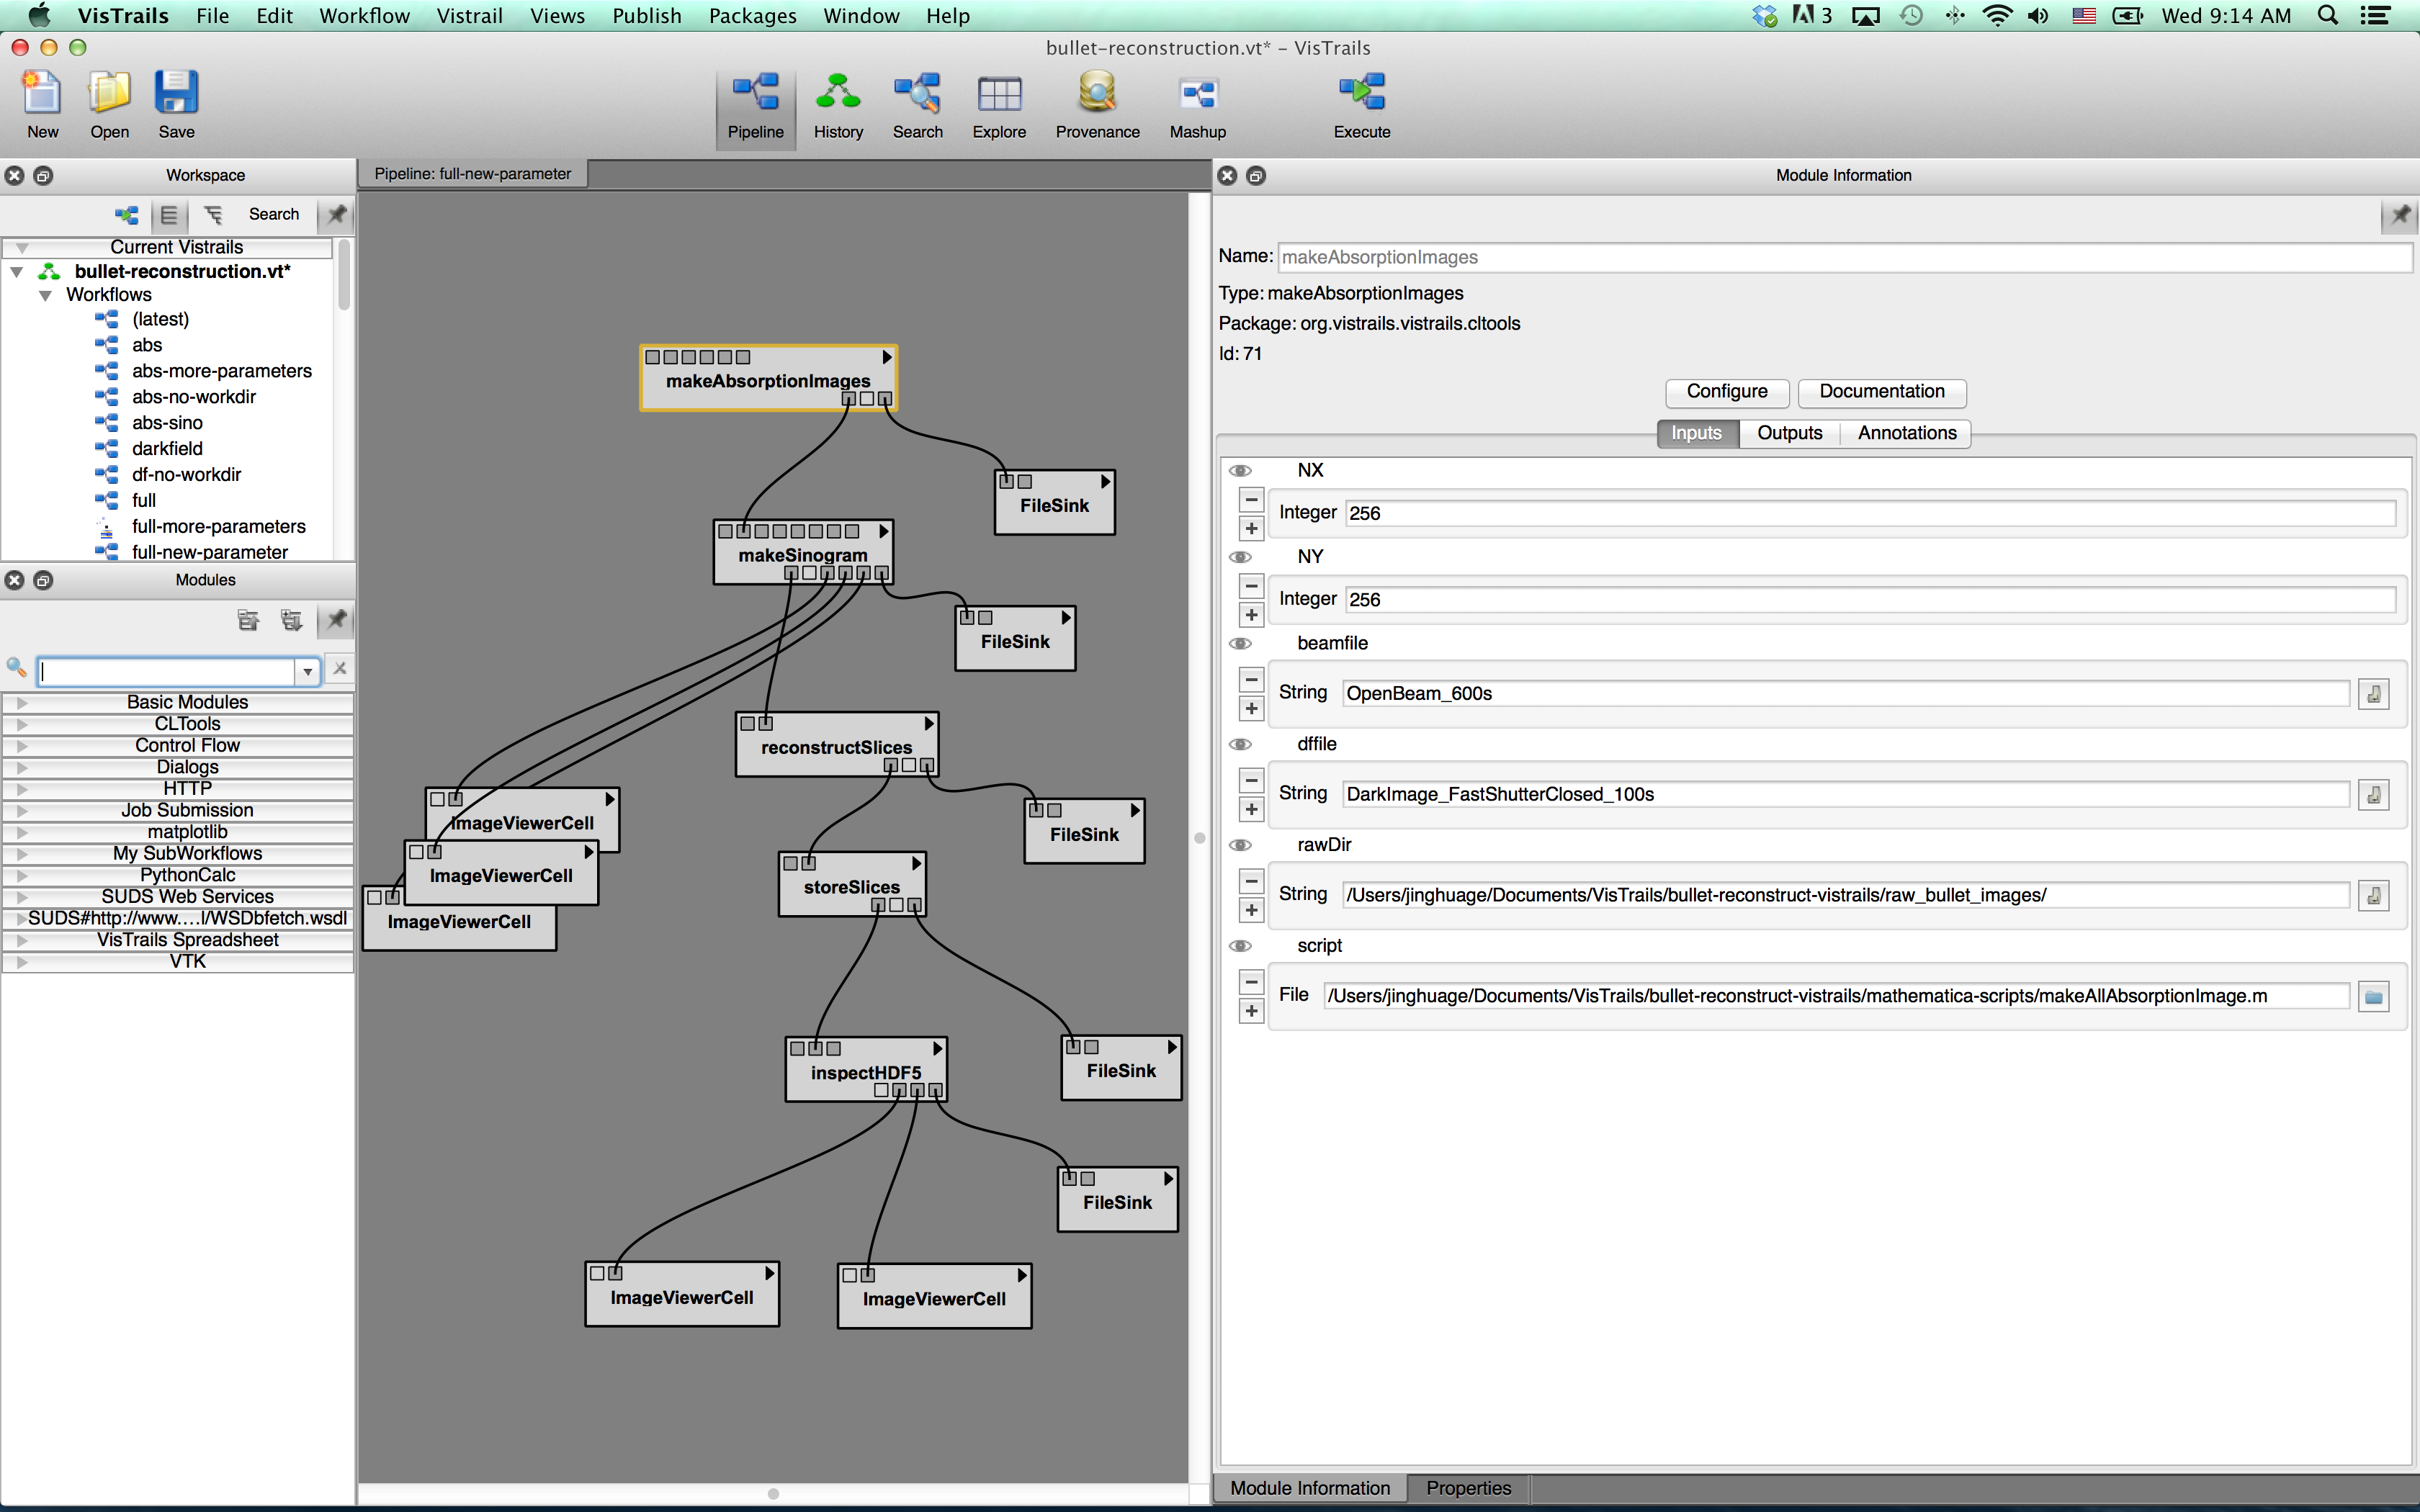
switch to Pipeline panel, for module “makeAbsorptionImages”, change “script” port to where mathematica script “makeAllAbsorptionImage.m” sits. “RawDir” port needs to be the full path of the “<path-to-project>/<raw-bullet-images-path>/” directory. Don’t forget the slash at the end of the path. For example, I am setting the “RawDir” port to string “/Users/jinghuage/Documents/VisTrails/bullet-reconstruct-vistrails/raw_bullet_images/”.
Change “script” port to corresponding mathematica scripts in modules “makeSinogram”, “reconstructSlices”, “storeSlices”, and “inspectHDF5”.
Here is a screenshot of inputports settings for “makeAbsorptionImages” module.
Check the fileSink modules, make sure the outputpath is correct for your file system.
Save workflow, tag your version.
You should be good to go, execute the workflow. A lot of data will be generated, so execution is slow.